
Auto Trade Setup
CAUTION: Auto Trading with live money is risky, and should NOT be enabled without supervision! There is no Holy Grail. It is not “Set it and forget it”. You are solely responsible for all trades taken manually or automatically. Plan on monitoring all Auto Trades.
One strategy followed by many auto traders is to leave Auto Trading Disabled until you start seeing arrows forming, and then when you like where price action is going, enable Auto-Trading. After entering the trade, immediately disabling auto trading will allow you to exit the trade knowing it won’t jump in on the next candle that may not be one you want to enter on.
Auto Trading in Sierra can be done in Simulation Mode (local or server based) or with Live Money. There are several safety checks in place to make sure you really want to trade live money. You can see the Auto Trade signals (Arrows) at all times, only if all the Auto Trade switches have been enabled will it trade live money.
- Startup: Auto Trade is Disabled
Your Trade Menu should look like this when you start up Sierra Chart:
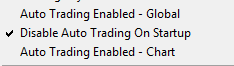
The only item checked is “Disable Auto Trading on Startup. This should stay checked. That way the next time you start Sierra, you won’t start Auto Trading unexpectedly.
- Enable Global Auto Trading
This is the Master Switch that turns on and off all (Global) Auto Trading. Note that turning it on the first time will not begin Auto-Trading, it is more like the Big Red Switch or EMO that shuts off any Auto Trading that is going on. For now, we will turn it on by doing Trade>>Auto Trading Enabled – Global.
Each Chart can also have Auto Trading Enabled or Disabled. The setting for the chart is Auto Trading Enabled – Chart. This setting is saved with the chartbook. The default is that it is disabled.
Your Trade menu should look like this:
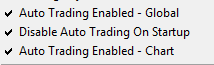
Any chart that you are OK with Auto Trading from should have checkmarks for both Auto Trading Enabled – Global and Auto Trading Enabled – Chart.
- Disable Auto Trading from charts you don’t want to auto trade from
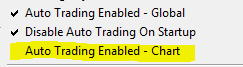
Any chart you don’t want to Auto Trade from should have “Auto Trading Enabled – Chart” UNCHECKED.
Like this:
- Ready to Auto-Trade? Remember Auto Trading is not “set it and forget it”. Its main benefit is the timing of the entries as soon as the proper conditions are met. You should plan on monitoring all trades, and take control if it is not going as you think it should. Also watch for trades taken near the end of the trading day, as they may not exit automatically!
- Live Trading (Real money or Simulation Server when available)
Trades are sent to the trade service, and if it is the Live Service, real money is at stake.
- Uncheck Trade>Trade Simulation On
![]()
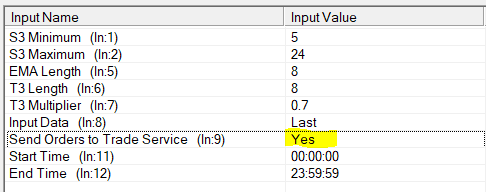
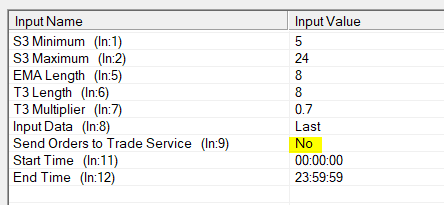
- Studies: ID1 S3 V3 Auto Trade Settings
- Send orders to Trade Service = Yes
- Confirm you have checked Trade>>Auto Trading Enabled – Global and Trade>Auto Trading Enabled – Chart
- SIM (Local Sierra Simulation Server – use for Playback, Back-testing, and Forward Testing)
All trades are simulated on your machine, whether you are connected to the trade service or not.
- Check Trade>Trade Simulation Mode On
![]()
- Confirm trades are not being sent to the Trade Service.
- Edit Study: ID:1 S3 V3 Auto Trading System (or whichever Spreadsheet Study you are using)
- Confirm you have checked Trade> Auto Trading Enabled – Global and Trade>Auto Trading Enabled – Chart
- Disable Live Trading:
- All Charts in All Chartbooks: Uncheck Trade>>Auto Trading Enabled – Global
- Just Specific Charts: Uncheck Trade>>Auto Trading Enabled – Chart.
Note that you can disable Auto Trade for specific charts by Unchecking Auto Trading Enabled – Chart for each chart you want disabled. The Global setting controls ALL Auto Trading.
Buttons for Auto-Trade Enable/Disable
To simplify the setting of the Auto Trade-Global and Auto Trade Chart, you may want to add a button for each to the control bar.
- To do this click Global Settings>>Customize Control Bars>> Control Bar 1 (or whichever one you are using).
- On the left scroll down to Trade and click the “+” sign to expand the list:
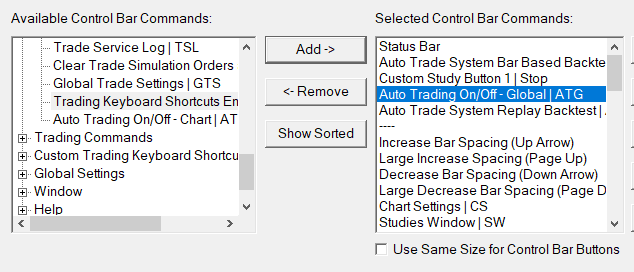
- Scroll down to “Auto Trading On/Off – Global|ATG” and select it and click “Add->”
- You will see the selected item move to the right side:
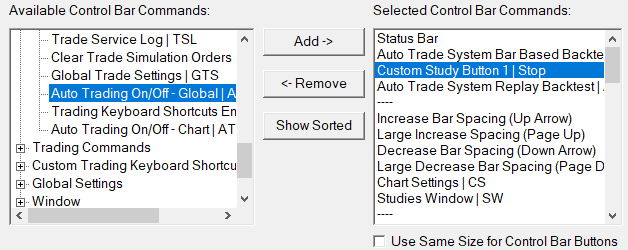
- Repeat steps 1 and 2 for “Auto Trading On/Off | ATC” and click OK.
- You should now have two buttons labeled ATG and ATC on your control bar.
![]()
Note the ATG is Enabled because it appears depressed, the ATC is not enabled.
The ATC button will change appearance as you go from one chart to another depending on whether that chart is enabled or not. This is a shortcut to visually check the setting and to change it quickly.